
Table of Contents
Installation
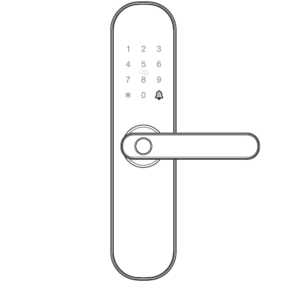
These are the installation instructions for the Alfawise Tuya E202 Smart Lock.
If you are looking to add a code or program your lock, visit here.
If you are looking for instructions on how to replace the batteries, visit here.
1. Installation Instructions
a. It is recommended lo look for professionals to install, watch the video carefully before installing.
b. Please note that the connection line can’t be pressed or folded during installation.
c. Before the installation, the lock must be selected correctly according to the door opening direction, because the handle can’t be adjusted.
d. While installing, the door must be in half open state until the commissioning is completed.
e. After the installation is completed, when the fingerprint, card, password(1234567890) and #, APP, key unlock, test whether the front handle and back handle unlock/lock normally or not.
f. If it does not work properly, please check if there is improper installation or the power cord is loose.
2. Installation Overview

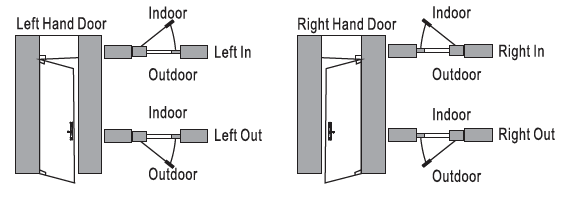
3. Confirm The Direction of The Door
This smart lock is suitable for Left Out/Left In/Right Out/Right In) 4 kinds of door opening directions,
4. Open Hole
Please refer to the opening hole drawing, and drill right holes on the door.
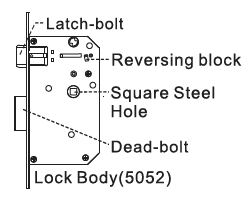
5. Install Lock Body
5.1. Choose the lnstelletlon direction of the latch-bolt of the lock body by
the door opening directions.
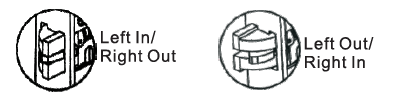
5.2. Change the direction of lock body
a. Push the reversing block to the other side.
b. Push the latch-bolt into the lock and turn 180 degrees.
c. Put back the reversing block, and the latch-bolt will pop up automatically.
5.3. Put the lock body into the door frame and tighten 2 fixing screws.
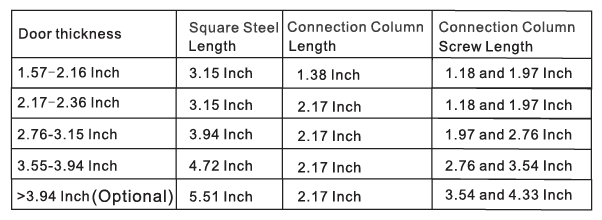
6. Choose The Parts
Choose suitable parts according to the following table.
7. Install The Lock
7.1 Install 2 connection columns on the front panel.

7.2 Install The Front Panel
a. Insert the suitable square steel into the lock body.
b. Pass the connection line through the door hole.
c. Align the square steel with the square steel hole of the front panel and fix the front panel on the door, then press the other end of the square steel.
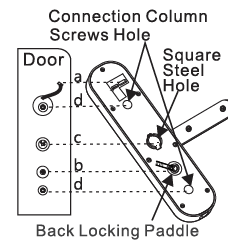
7.3 Install The Back Panel
a. Press the front panel, and connect the connection line with the corresponding interface of the back panel, then insert the excess line into the door hole.
b. Insert back locking paddle into the lock body, and you can cut off one or two sections of back locking paddle according to the thickness of the door.
Note: The length of back locking paddle does not exceed the thickness of the door.
c. Align the square steel with the square steel hole of the back panel, and compress the back panel.
d. Lock 2 connection column screws to fix the back panel.
e. Install 4 AA batteries and the battery cover, then lock the battery cover screw.
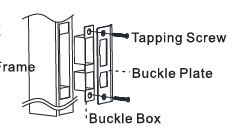
8. Install Buckle Plate And Buckle Box
9. Debugging
a. Please always keep the door in half open status when debugging.
b. Check the following function can be achieve or not. Press down front handle, latch-bolt/dead-bolt remains in locking status. Press down front handle, latch-bolt/dead-bolt retract in unlocking status. Lift up front handle, dead-boll stretches out in any status. Press down back handle, latch-bolt/dead-bolt retract in any status. Lift up back handle. dead-bolt stretches out In any status.
c. When reverse locking from inside, press down front handle/ back handle, latch-bolt/dead-bolt remains.
d. Verify other function norm al or not, including self locking, virtual password, setting button, APP etc.
Information & Safety Warnings
Note: Please prepare a Phillips screw driver and 4 AA batteries before installation.
1. Keep your fingers clean before using this product.
2. In original settings, ii can be unlocked with any fingerprint, any card, or password” 1234567890′ ended with’#’.
3. Unlock: Press registered fingerprint on front handle sensor, or make card close to lock pad, or enter password ended with”#”.
4. If the power is insufficient, there will be an alarm prompt, and the lock can be only unlocked around 50 times, please replace with 4 new batteries in time. When batteries power running out, connecting a power bank with Micro USB line though Emergency Power Port can unlock, but the APP network function will be failure.
5. Please don·t use corrodent material to clean the surface.
6. When the password/fingerprint/card/APP can not unlock the door, please use the key to unlock the door. Plee1111 keep the emergency key with you or put it in outdoor safe place.
7. Waking up lock needs around 3 seconds or more, when long time no using. The lock is suitable for 1.57 -3.94INCH thick doors.
9. Work temperature range: -22’F ~ 131 ° F.
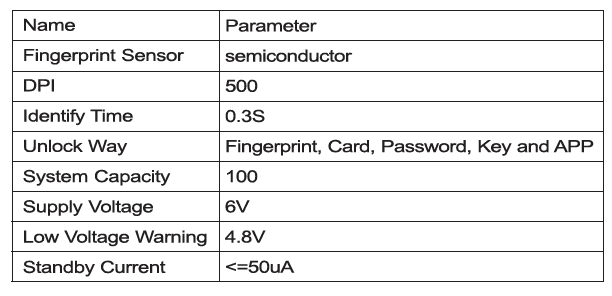
Features
1. The total capacity of system is 100, and the first three are administrator.
2. Touching button, durable.
3. Support 6-8 password and 20 virtual password.
4. Support low power warning.
5. Support volume adjustment and door bell.
If you are looking to add a code or program your lock, visit here.
If you are looking for instructions on how to replace the batteries, visit here.
Get the Tuya Smart Lock App on your phone:
For Android, click here.
For iPone, click here.